
I’m sure you have been here several times in the past. Writing a report or long document with lots of headings to paragraphs and sections and you simply cannot remember what size of font you used for which heading. You don’t even remember if it was underlined for every level or just the first, or which particular colour of blue you chose. It would look really out of place if this report didn’t look just like the last since the same people are going to be reading both at the same time. Or let’s take another scenario. Typing up minutes whilst in the meeting. Wouldn’t it be easier to see at a glance who said what if the text was in different colours or fonts. You can do this with styles.
It’s hard to remember the slight differences or even most time consuming to go back to an old file and figure out what all the differences were. So the answer to make your life easier is ‘Styles’.
Styles is quite a large subject so for this article I am just going to focus on using the pre-prepared by Microsoft styles. Look out for another Tip later on more complex use and creating your own Styles.
Firstly, I would like to say that you can apply a style at any time to your work. It really depends upon you when you do. For instance, you might be a person who likes the ‘look’ to be there as you write, or you may like to write the whole thing and not be distracted by looks until your happy with the content. For the sake of argument, I am going down the first route.
What we need to establish first is where are the Styles held and what do they do.
On the home tab 
To the right hand side there is a large area all for Styles. There are many that Microsoft has created for you. 
The first is called ‘Normal’ this will be used for the main body of text in your work. We shall investigate what properties this holds. To be able to do this right click on the name Normal and select Modify from the list.
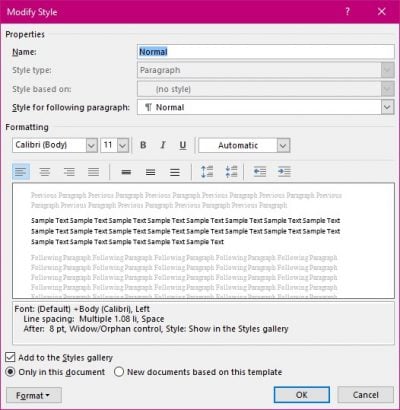
So working down this dialog box we start at the top with Name: – Normal.
Style Type: is defaulting to Paragraph. This is because this style will apply to the whole paragraph not just the word or words you are selecting at the time of choosing the style.
Style Based on: in this case there is no style as this is the base to all your future styles.
Style for following paragraph: is defaulting to Normal, which in my opinion is the best as whenever you start writing in any style as soon as you type the return key you are back to normal style when you can select to use s different style if needs be.
Formatting: here you can change the type face to one you prefer. Use the Bold, Italic of Underlining features also the colour you wish to use.
Next we have the ability to select the alignment, line spacing, spacing between paragraphs and indentation.
Under the preview area there is a list of all of the settings for you to see at a glance.
There is a box that is selected by default to Add this style to the Styles Gallery, which is where we saw it in the beginning on the Home Tab.
If you should make any changes in the Dialog Box you can either keep these for just this document or have it available for future documents which are based on this template. This is the Normal Template in our example.
Further formatting can be access through the Format button on the bottom left of this window. 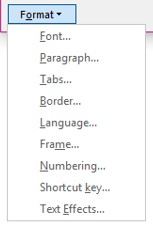 For me the Shortcut Key… is very important.
So now you know how to investigate what each style holds take some time to investigate the others. For instance, the Emphasis Style is one that is character not paragraph based. And the Style is based on a default paragraph font, meaning that if the paragraph where you are to select a word in and apply the emphasis style, the font will not be changed just the other settings such as colour or italics. 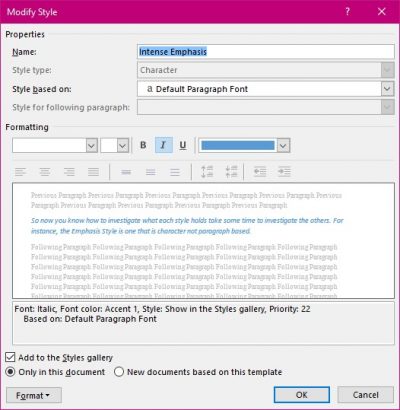
How to apply a style while you are writing a document.
You can apply a style just before you start writing or in the middle of the paragraph. Make sure your flashing cursor is where you are about to apply the style and select it from the Style Gallery.
If you great at typing you might like to apply a style using keys rather than the mouse. This is where Shortcut Keys come into play.
Applying a Shortcut Key to a Style
Select Modify for the style you wish to use.
Select the format button at the bottom of the dialog box.
Select the Shortcut Key from the list.
For my example I have chosen the Heading 1 style 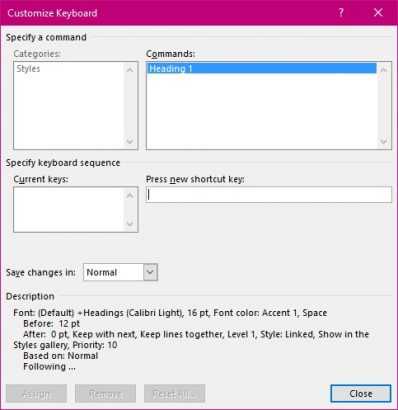
In the centre of this dialog box there is a flashing cursor. Here you are invited to type in the keys you wish to use. Please be careful here and read the screen as you may override an existing shortcut that is very useful. For instance, CTL+C is used to copy selected text. 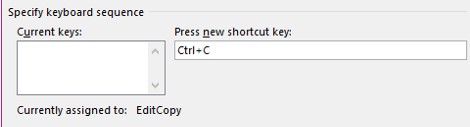
Fortunately, Word does let you know that it is already in use. You can use the Control Key, the Shift Key and the Alt Key together with any letter or number. I find that the easiest to remember and use. When you are using the heading 1 to 9 styles it is ALT+1 for the Heading 1 through to ALT+9 for heading 9. Leaving ALT+0 for normal style.
You are now about to start writing your report or minutes to a meeting. You have your styles set and with shortcut keys. Begin with using the shortcut key for Heading 1 then start typing. All styles have the Normal Style as the following style. When you type in the return key you are back to normal body type. If this is not what you require, type the shortcut key corresponding to the style you do require. Now when you write your next report it will have the exact same look as this one and the one after that. All without breaking into a sweat.
Lookout for my next Tip on creating your own styles.


